Lists
기본 형태
<!DOCTYPE html>
<html>
<body>

<h2>An Unordered HTML List</h2>

<ul>
  <li>Coffee</li>
  <li>Tea</li>
  <li>Milk</li>
</ul>

<h2>An Ordered HTML List</h2>

<ol>
  <li>Coffee</li>
  <li>Tea</li>
  <li>Milk</li>
</ol>

</body>
</html>
Unordered HTML List
<ul>
	<li>Coffee</li>
    <li>Tea</li>
    <li>Milk</li>
</ul>

<ol>
	<li>Coffee</li>
    <li>Tea</li>
    <li>Milk</li>
</ol>
<!DOCTYPE html>
<html>
<body>

<h2>An Unordered HTML List</h2>

<ul>
  <li>Coffee</li>
  <li>Tea</li>
  <li>Milk</li>
</ul>

<h2>An Ordered HTML List</h2>

<ol>
  <li>Coffee</li>
  <li>Tea</li>
  <li>Milk</li>
</ol>

</body>
</html>
ul : unorderd list
ol : ordered list
li : list item
화면 설계할 경우, 테이블 보다는 리스트 사용을 권장!
<dl>
  <dt>Coffee</dt>
  <dd>- black hot drink</dd>
  <dt>Milk</dt>
  <dd>- white cold drink</dd>
</dl>
쓸 일 거의 없다.
list-style-type
- value
- disc
- circle
- square
- none
default가 disc
Horizontal List with CSS
<!DOCTYPE html>
<html>
<head>
<style>
ul {
  list-style-type: none;
  margin: 0;
  padding: 0;
  overflow: hidden;
  background-color: #333333;
}

li {
  float: left;
}

li a {
  display: block;
  color: white;
  text-align: center;
  padding: 16px;
  text-decoration: none;
}

li a:hover {
  background-color: #111111;
}
</style>
</head>
<body>

<ul>
  <li><a href="#home">Home</a></li>
  <li><a href="#news">News</a></li>
  <li><a href="#contact">Contact</a></li>
  <li><a href="#about">About</a></li>
</ul>

</body>
</html>- float: left
가장 기본적인 형태이므로 외워라.
※ 영어 단어 적기!
Tables
단순하게 테이블을 그리는 용도 뿐만 아니라 배치용으로 많이 사용
<tr> : 중요한 개념
- table row 의 약자
- row의 반대는 column
<th> : table header
<td> : table data
<!DOCTYPE html>
<html>
<head>
<style>
table, th, td {
  border: 1px solid black;
  border-collapse: collapse;
}
</style>
</head>
<body>

<h2>Table With Border</h2>

<p>Use the CSS border property to add a border to the table.</p>

<table style="width:100%">
  <tr>
    <th>Firstname</th>
    <th>Lastname</th>
    <th>Age</th>
  </tr>
  <tr>
    <td>Jill</td>
    <td>Smith</td>
    <td>50</td>
  </tr>
  <tr>
    <td>Eve</td>
    <td>Jackson</td>
    <td>94</td>
  </tr>
  <tr>
    <td>John</td>
    <td>Doe</td>
    <td>80</td>
  </tr>
</table>

</body>
</html>
Border-style

Table Sizes
중요하다!
HTML Table Headers
<table>
  <tr>
    <th>Firstname</th>
    <th>Lastname</th>
    <th>Age</th>
  </tr>
  <tr>
    <td>Jill</td>
    <td>Smith</td>
    <td>50</td>
  </tr>
  <tr>
    <td>Eve</td>
    <td>Jackson</td>
    <td>94</td>
  </tr>
</table>
<colspan> : column을 확장해라.
<rowspan> : row를 확장해라.
Padding & Spacing
spacing : 간격
각각의 padding
- top
- bottom
- left
- right
HTML Table - Zebra Stripes
border-bottom
hover
colgroup : 컬럼 그룹 - 중요한건 아니다.
Hide Columns
- HTTP는 상태를 저장하지 못함. 변수에 데이터를 저장하기 어려움. 뭔가 데이터를 저장하고 싶은데 내부적으로 사용하고 싶은데 데이터가 보여지면 이상하니깐 데이터가 안보이도록 하기위해 쓰인다.
Block and Inline Elements
block은 한 줄을 전부 차지하는 것이다.

- hr, li, h1
Inline Elements
<!DOCTYPE html>
<html>
<body>

<p>This is an inline span <span style="border: 1px solid black">Hello World</span> element inside a paragraph.</p>

<p>The SPAN element is an inline element, and will not start on a new line and only takes up as much width as necessary.</p>

</body>
</html>

- span, a, label
정리
Inline하고 block이 있다.
<div>
어떤 영역으로 지정하고 싶은 경우. 가장 많이 사용됨.
<span>
ID and Class
class도 type이고 object는 값
Integer와 class의 차이
: Integer는 시스템에서 만들어서 제공하는것
: class는 사용자가 만드는 것.
ID
- identifier : 이름
- 요소의 이름이다.
<!DOCTYPE html>
<html>
<head>
<style>
#myHeader {
  background-color: lightblue;
  color: black;
  padding: 40px;
  text-align: center;
}
</style>
</head>
<body>

<h1 id="myHeader">My Header</h1>

</body>
</html>
id는 하나의 요소를 가리킨다.
<!DOCTYPE html>
<html>
<head>
<style>
/* Style the element with the id "myHeader" */
#myHeader {
  background-color: lightblue;
  color: black;
  padding: 40px;
  text-align: center;
}

/* Style all elements with the class name "city" */
.city {
  background-color: tomato;
  color: white;
  padding: 10px;
}
</style>
</head>
<body>

<h2>Difference Between Class and ID</h2>
<p>A class name can be used by multiple HTML elements, while an id name must only be used by one HTML element within the page:</p>

<!-- An element with a unique id -->
<h1 id="myHeader">My Cities</h1>

<!-- Multiple elements with same class -->
<h2 class="city">London</h2>
<p>London is the capital of England.</p>

<h2 class="city">Paris</h2>
<p>Paris is the capital of France.</p>

<h2 class="city">Tokyo</h2>
<p>Tokyo is the capital of Japan.</p>

</body>
</html>- 클래스는 어떤 type을 지정해주는 것. 그것만 지정해주면 다 적용되도록 할 수 있다.
- 매우 중요.
정리
- class를 사용하면 여러 개의 요소를 한번에 지정할 수 있다.
- 아무것도 지정안해주면 tag
- #이 있으면 id
- .이 있으면 class
<a href="html_demo.html#C4">Jump to Chapter 4</a>다른 곳의 주소로 가기 위함.
Using The id Attribute in JavaScript
DOM이란? Document Object Model
text로 되어있는 것을 읽어서 data로 만들어 놓은 것.
html을 적어놓으면 읽어서 분석해서 모델을 만들고 이런 모델을 브라우저가 읽어서 화면에 보여주는것.
데이터를 바꿔주어야 화면이 바뀐다.
이러한 데이터를 DOM이라 한다.
이러한 데이터의 이름을 Document
그 Document안에 html 하나가 있음
트리모양으로 구성됨.
document.getElementById("myHeader") 와 같은 메소드로 트리를 recursion으로 탐색하지 않고 편리하게 사용할 수 있도록 제공함.
document.getElementById("myHeader").innerHTML
정리
- HTML은 그냥 텍스트
- 브라우저는 HTML을 파싱함.
<!DOCTYPE html>
<html>
<body>

<h2>Use of The class Attribute in JavaScript</h2>
<p>Click the button to hide all elements with class name "city":</p>

<button onclick="myFunction()">Hide elements</button>

<h2 class="city">London</h2>
<p>London is the capital of England.</p>

<h2 class="city">Paris</h2>
<p>Paris is the capital of France.</p>

<h2 class="city">Tokyo</h2>
<p>Tokyo is the capital of Japan.</p>

<script>
function myFunction() {
  var x = document.getElementsByClassName("city"); #배열로 리턴
  for (var i = 0; i < x.length; i++) {
    x[i].style.display = "none";
  }
}
</script>

</body>
</html>
HTML Forms
Form이란?
: id, password, submit
<!DOCTYPE html>
<html>
<body>

<h2>HTML Forms</h2>

<form action="/action_page.php">
  <label for="fname">First name:</label><br>
  <input type="text" id="fname" name="fname" value="John"><br>#내부용, 외부용 name
  <label for="lname">Last name:</label><br>
  <input type="text" id="lname" name="lname" value="Doe"><br><br>
  <input type="submit" value="Submit">
</form>

<p>If you click the "Submit" button, the form-data will be sent to a page called "/action_page.php".</p>

</body>
</html>
PHP : 요즘 안쓰는 분위기
ASP : MS에서 만든 옛날에 썼던것
NodeJS : 우리가 배울 것.
SI : 하드코딩을 주로 하는 것이 java, java로 만든게 JSP, JSP로 EJB, 그걸로 부족해서 Spring, 그걸 또 한게 Share(?)
<!DOCTYPE html>
<html>
<body>

<h2>Radio Buttons</h2>

<p>Choose your favorite Web language:</p>

<form>
  <input type="radio" id="html" name="fav_language" value="HTML">
  <label for="html">HTML</label><br>
  <input type="radio" id="css" name="fav_language" value="CSS">
  <label for="css">CSS</label><br>
  <input type="radio" id="javascript" name="fav_language" value="JavaScript">
  <label for="javascript">JavaScript</label>
</form>

</body>
</html>
name은 서버에 전송되는 변수명, value는 변수 값
id는 html에서 사용될 요소의 id
checkbox
submit button
<!DOCTYPE html>
<html>
<body>

<h2>The name Attribute</h2>

<form action="/action_page.php">
  <label for="fname">First name:</label><br>
  <input type="text" id="fname" name="ffname" value="John"><br><br>
  <input type="submit" value="Submit">
</form>

<p>If you click the "Submit" button, the form-data will be sent to a page called "/action_page.php".</p>

<p>Notice that the value of the "First name" field will not be submitted, because the input element does not have a name attribute.</p>

</body>
</html>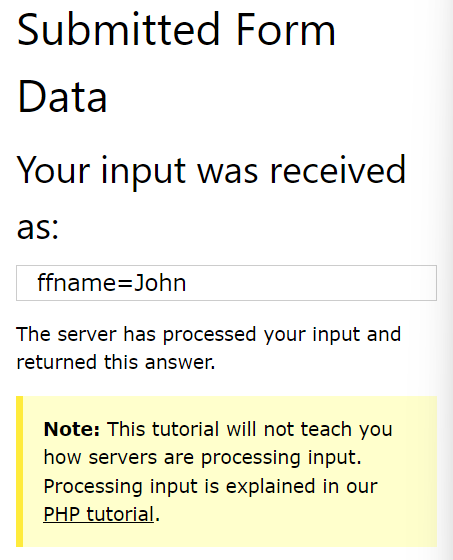
Form Attributes
The Target Attribute
- _blank
- _self
HTTP가 무엇인가?
HTTP는 Stateless Network Protocol이다.
state : 정보
stateless : 정보가 없다.
Method Attribute
Get과 Post의 차이점
- post는 데이터가 숨겨져 있어 북마크가 어려움.
- String으로 적기 때문에 길이가 제한됨.
- post는 큰 데이터도 포함시킬 수 있음.
- 둘을 상황에 맞게 사용함.
- 간단 : get
- 복잡 : post ex) 아이디, 비밀번호
- get
- 암호 보내지 마라.
- 북마크 사용 가능.
- post
- 사이즈 제한이 없다.
- 북마크 안된다.
- 제한된 URL을 보여준다.
The No-validate Attribute
<form action="/action_page.php" novalidate>
  <label for="email">Enter your email:</label>
  <input type="email" id="email" name="email"><br><br>
  <input type="submit">
</form>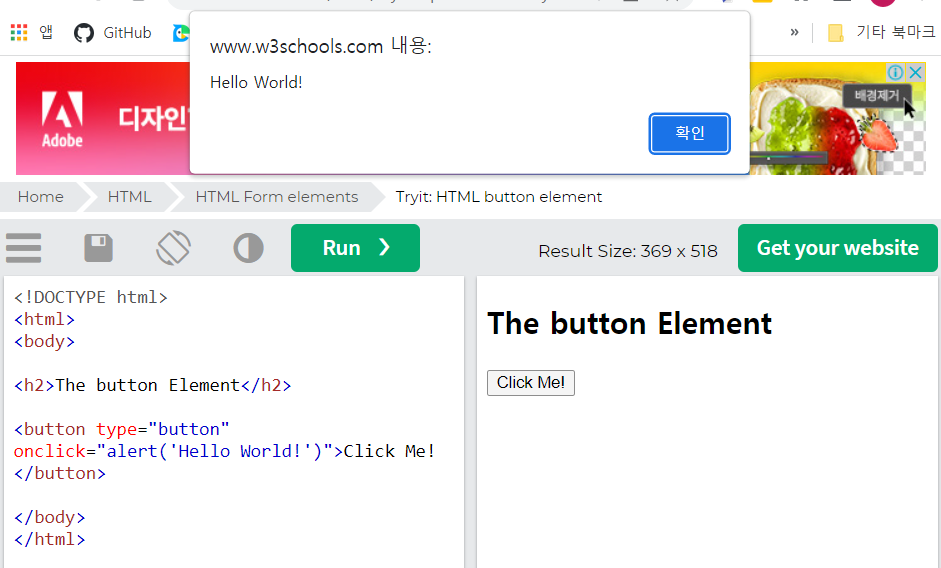
The pattern Attribute
regular expressions :
ex) d* : d로 시작하는 모든 스트링(하나의 패턴)
<!DOCTYPE html>
<html>
<body>

<h1>The input pattern attribute</h1>

<p>The pattern attribute specifies a regular expression that the input element's value is checked against.</p>

<form action="/action_page.php">
  <label for="country_code">Country code:</label>
  <input type="text" id="country_code" name="country_code" pattern="[A-Za-z]{3}" title="Three letter country code"><br><br>
  <input type="submit" value="Submit">
</form>

<p><strong>Note:</strong> The pattern attribute of the input tag is not supported in Safari 10 (or earlier).</p>

</body>
</html>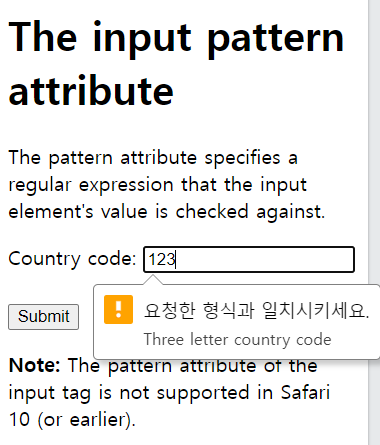
[A-Za-z]{3}
: 대문자든 소문자든 다 된다.
: 3문자가 연속되어야 한다.
- 지정하기 상당히 까다롭다 → 구글 검색 : 정규식 전화번호
function check_phone() {

  var phone = document.getElementById("phone").value;


  var regPhone= /^01([0|1|6|7|8|9])-?([0-9]{3,4})-?([0-9]{4})$/;

  if (regPhone.test(phone) == true) {

    alert("휴대전화 번호가 맞습니다.");

  }

}
-? : -가 있어도 되고 안들어가도 됨
/^ : 시작 조건
$/ : 끝 조건
The placeholder Attribute
<form>
  <label for="phone">Enter a phone number:</label>
  <input type="tel" id="phone" name="phone"
  placeholder="123-45-678"
  pattern="[0-9]{3}-[0-9]{2}-[0-9]{3}">
</form>
The autofocus Attribute
<form>
  <label for="fname">First name:</label><br>
  <input type="text" id="fname" name="fname" autofocus><br>
  <label for="lname">Last name:</label><br>
  <input type="text" id="lname" name="lname">
</form>
autofocus : 자동으로 포커싱되도록 해줌.
EventHandler 동작
회사 업무 환경

pseudo : 가상
. 연결
p태그이면서 center클래스로 지정된 요소들
p.center { text-align: center; color: red;}
The CSS Universal Selector
* {
  text-align: center;
  color: blue;
}
다음 시간
: CSS - How To Add CSS
'학교수업 > 웹프로그래밍' 카테고리의 다른 글
| Bootstrap: CSS Framework (0) | 2023.06.16 |
|---|---|
| Graphics (0) | 2023.06.16 |
| [0323~0328] 웹프 (0) | 2023.03.23 |
| [웹프] 0314 (0) | 2023.03.14 |
| [웹프] 0307 (0) | 2023.03.07 |